Bell Fibe Internet or Bell Aliant FiberOP Internet is a popular choice among Canadians. However the equipment provided by Bell and Bell Aliant may not suit everyone’s needs. If you’ve tried to attach a router to a Bell modem you will quickly realize that multiple internal networks are created as the Bell modem acts as a router and wireless access point. It becomes even more convoluted if you require port forwarding. To make matters worse, the Bell equipment could interfere with your personal router’s wireless network performance. There’s a better way to use your own personal router with Bell Internet.
Overview
Note: at the time of writing this Bell Aliant FibreOP is currently being re-branded to Bell Fibe. The instructions below were written using Bell Aliant FiberOP Internet. It’s possible that some of the steps below could change as new firmware is pushed to Bell Aliant’s equipment. It would be greatly appreciated if you could comment below should you notice any changes. Thanks!
The steps below are quite basic if you have any experience configuring a router or network device. We’ll be accessing Bell Aliant’s equipment through an administration web interface and then we’ll enable the Advanced DMZ. This will allow your third-party router to obtain a public IP address without any interference from the Bell equipment. No firewalls, DHCP, Port Bridging, or vLAN configurations are required. This is simple and easy.
For those of you who are concerned about performing the steps below, this PDF document published for Bell Aliant’s business customers should answer any of your questions. Although unconfirmed, the steps below should also work on Bell Fibe Internet equipment outside the Atlantic Provinces. Let me know in the comments below.
From this point forward I’ll refer to Bell’s modem/router combination equipment as the “modem” and your personal third-party router as simply the “router”.
What about my television receivers?
Your Bell Aliant FibreOP television receivers should remain connected to the Bell Aliant modem. There’s absolutely no need to connect IPTV receivers to your own router. If you’re using wireless receivers, don’t disable WiFi on the Bell equipment.
Prerequisites
The rest of this guide will assume you currently have a computer directly connected over Ethernet to the Bell modem.
Determine your modem’s IP address
Typically the modem IP address is 192.168.2.1. You can test this by browsing to http://192.168.2.1. If successful, you should see a Bell Fibe/FiberOP page appear.
If needed, I’ve included instructions for determining your modem’s IP address.
- Click Start and type “cmd” and hit the enter key.
- At the command prompt type “ipconfig /all” and hit enter.
- Document the “Default Gateway” address. This is the IP address we’ll use to access the modem’s web interface where we can make the necessary changes. I’ll refer to this as the modem’s IP address.
Connect and configure your own router
This portion of the guide is a bit vague as the instructions vary by device but here’s an overview.
- Connect your own router’s WAN port (sometimes called the Internet port) to any LAN port (ports 1 – 4) on the Bell Aliant modem.
- Power cycle your router.
- Keep your computer connected to the Bell modem for now…
How to enable Advanced DMZ
The steps can vary by device. At the moment I only have instructions on how to enable Advanced DMZ on the R1000H, R3000, and Home Hub 3000. If you have a different modem model, I suggest trying the instructions anyway and let me know in the comments if you were successful.
Home Hub 3000
Using the Advanced DMZ option on the Home Hub 3000 is hit or miss. Try the steps below and let me know if you’re successful in the comments section. For those without Bell TV/Phone (internet only), you might be better off bypassing the Home Hub 3000 altogether. I’ll post more on how to bypass the Home Hub 3000 later.
- Launch a web browser and navigate to your modem’s IP address. Typically this will be http://192.168.2.1.
- Identify your third-party router’s MAC Address. Assuming your third-party router is already connected to your Home Hub 3000, you should be able to identify the MAC address using the My devices screen and referring to the Advanced column. You can also find your router’s MAC Address on the router itself, usually on a sticker on the bottom of the device (sometimes called a Physical Address). We’ll need the MAC Address of your personal router in order to enable the Advanced DMZ option.
- Select Advanced tools and settings. When prompted, enter the password “admin”. In some cases the password might be printed on a label attached to the Home Hub 3000.
- From the list of tools, click DMZ.
- Enable the DMZ and then select the checkbox beside Advanced DMZ. Enter the MAC address of your third-party router and save the changes.
- Wait 5 minutes.
- Now attach your computer and any other devices (other than IPTV devices – keep your television receivers attached to the Bell equipment) to your third-party router and check that your router’s WAN IP is a public IP address (The WAN IP of your router should not be something like 192.168.X.X).
R1000H or R3000
- Launch a web browser and navigate to your modem’s IP address. Typically this will be http://192.168.2.1.
- Login using the username “admin” and the password printed on a label attached to the Bell modem.
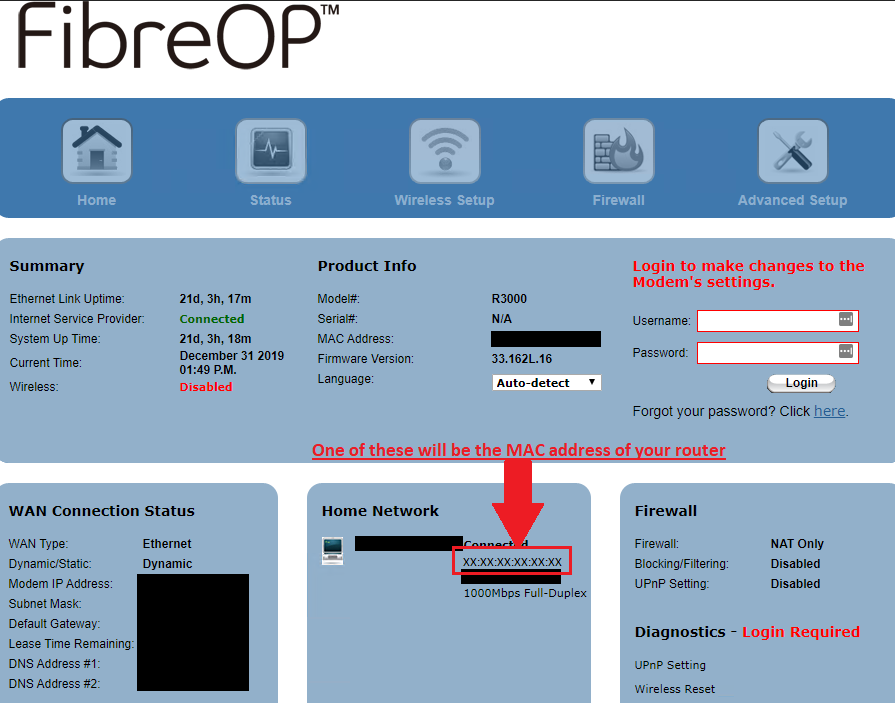
- From the main page, under Home Network section, identify your third-party router’s MAC address. You can also find your router’s MAC Address on the router itself, usually on a sticker on the bottom of the device (sometimes called a Physical Address). We’ll need the MAC Address of your personal router in order to enable the Advanced DMZ option.
- OPTIONAL: Select Wireless Setup.
- Select the frequency 5Ghz and set the Wireless Radio option to Disable. Click Apply to save the settings.
- Select the frequency 2.4Ghz and set the Wireless Radio option to Disable. Click Apply to save the settings.
- Select Firewall.
- Select Advanced DMZ from the menu on the left.
- Select Enable under Set the Advanced DMZ state.
- Select Manually Enter MAC Address from the drop down menu under Select a Device and input your third-party router’s MAC address in the text field.
- Click Apply.
- Wait 5 minutes.
- Now attach your computer and any other devices (other than IPTV devices – keep your television receivers attached to the Bell equipment) to your third-party router and check that your router’s WAN IP is a public IP address (The WAN IP of your router should not be something like 192.168.X.X).
It’s worth noting that Advanced DMZ is different than Port Bridging (aka Enhanced Bridge Mode, if you’re familiar). Unlike Port Bridging, Advanced DMZ allows access to the Bell modem should you need to access it.
So what about the Enhanced Bridge Mode?
Some of you who are familiar with Telus Optik Internet may have wondered why Bell Aliant doesn’t have the same Port 1 Bridging option. Bell Aliant appears to be using the same Actiontec equipment. I honestly can’t answer this question but I have found this PDF document which identifies issues with Port Bridging and favours Advanced DMZ. I’ve had the opportunity to configure Port Bridging on Telus Optik and Advanced DMZ on Bell Aliant. Both appear to accomplish the same thing – your own router with a public IP address. And both appear to work fine on the surface.
It worked! I followed your guide and the Bell pdf file you linked. I have Bell’s Actiontec 3000 and my new Asus AC3100 router. In the WAN window of my Asus, I set my router to the static address Bell has on their modem vice automatic option. When Bell changes my public ip, I have a feeling I will have to set the static IP on my router to the new Bell IP. Anyway, the setup was painless for me and worked first time. Thanks again for posting this.
I tried this with a Home Hub 3000 and a Linksys Velop AC6600 Mesh router. The Linksys was able to obtain a public IP address, but wasn’t able to get internet access 🙁 If anybody has some helpful hints, those would be much appreciated 🙂
Thanks for this, saved from dealing with the Aliant support hell. Only issue is my port forwarding is not working on the new router. Looked at syslog for the new router and think it is because there is still port forwarding rules on the actiontec that I didn’t remove. Any experience with that?
Are you sure your personal router has an external/public IP address?
Yes it had the external IP.
Looking at the syslog of the ubiquity USG every time I tried to connect to the forwarded port, the USG was seeing “martian packets”, packets with non routable IP addresses trying to come in to the outside interface. I removed the port forwarding rules from the actiontec router and everything worked perfectly. I had to go visit the site as the only way to connect to the actiontec again was by plugging directly into it.
Hello – I’m re-writing because I wanted to clarify/simplify my previous message. I did the above steps correctly and then at the very end, I got a private WAN IP instead of a public one. If I did each step correctly, why did I wind up with the very thing you said not to wind up with? Do you know how to correct this and help me get a public WAN IP (because I’m assuming that’s what I need for this whole process to be successful). Thanks!
If you ended up with a private IP, then the steps were not successful. Make sure the MAC Address of your router is properly added to the Advanced DMZ configuration. It’s important it’s formatted correctly. Reboot all equipment and try again.
Something else to try… in your personal router there should be an option to “release” the WAN IP. Do this and then Renew. Perhaps your router is holding onto an old IP.
If that doesn’t work, let me know the make and model of your router.
Thanks for this. Everything seemed to work smoothly except right at the end where you say “the WAN IP of your router should NOT be something like 192.168.x.x.” You didn’t provide an explanation for why it shouldn’t be like that. The IP changed for me and was assigned to the Nest Wifi Router but it is indeed in the format you say it should not be like. Just the last two numbers changed. Am I missing something here? I feel like I must be. I’m savvy with computers but terrible with network stuff. If you’re still checking this comment section, it’d be great if you could help out.
Hey, wondering why can’t I use a router to connect to my FibeTV boxes? Is there a way to use a mesh network to boost IPTV signal? Thx
I don’t have any experience setting up wireless IPTV boxes. I believe they typically use their own WiFi network on the Bell equipment. You could try requesting a range extender from Bell.